Most people think grilling is about fire. It's not. It's about heat placement.
You can have the most expensive gas grill on the market, a pristine set of tongs, and a prime-cut ribeye — and still ruin dinner if you don't understand where the heat is coming from and how it's reaching your food. The two foundational methods — direct heat and indirect heat — are the entire grammar of outdoor cooking. Everything else is vocabulary.
This guide will break both methods down in real terms: what they are, when to use each one, how to set up your grill correctly, and how to combine them for results that are genuinely consistent, not just accidentally good.
What Is Direct Heat Grilling?
Direct heat is exactly what it sounds like. Your food sits directly above the heat source — the flame, the hot coals, the glowing burner. The heat travels straight up and hits the bottom of whatever you're cooking.
The result? Fast, aggressive cooking with serious surface caramelization. This is the method responsible for the crust on a burger, the char on a hot dog, and those coveted grill marks on a chicken breast.
Direct heat excels at cooking foods that are:
- Thin or small — steaks under an inch thick, shrimp, vegetables sliced thin, fish fillets
- Fast-cooking — anything that reaches safe internal temperature before the outside burns
- Designed for texture contrast — where you want a crispy, charred exterior and a juicy center
The danger with direct heat is that it gives you almost no margin for error. High heat over a flame doesn't care about your schedule. Walk away for three minutes too long, and a beautiful pork chop becomes a carbon disk. Direct heat rewards attention and punishes distraction.
Setting Up a Gas Grill for Direct Heat
Turn all burners on to your target temperature (medium-high for most proteins), close the lid, and let it preheat for 10–15 minutes. Once you're up to temperature, you're cooking directly — all the heat is active beneath the grates.
Setting Up a Charcoal Grill for Direct Heat
Light your charcoal and let it ash over completely — you want gray coals, not black ones still sparking. Spread them evenly across the charcoal grate in a single, even layer. The food goes right above the coals. Simple, powerful, and ruthlessly efficient.
What Is Indirect Heat Grilling?
Indirect heat is convection cooking in an outdoor environment. The heat source is beside the food, not beneath it. Air circulates around the food, cooking it evenly and gently without scorching the surface.
Think of it less like a skillet and more like an oven. The temperature inside your closed grill is the cooking temperature, and the food benefits from that ambient heat rather than direct flame contact.
Indirect heat is the right choice for:
- Large, thick cuts — whole chickens, pork shoulders, briskets, racks of ribs, leg of lamb
- Foods that need time — anything where the inside needs to reach temperature before the outside is done
- Delicate items — whole fish, stuffed peppers, bread rolls, desserts cooked on the grill
- Anything that would burn over direct flame — foods with sugary marinades, skin-on poultry, bone-in cuts
The patience required for indirect cooking is rewarded with something direct heat simply cannot deliver: even doneness, tender interiors, and cooked-through proteins that haven't been carbonized on the outside.
Setting Up a Gas Grill for Indirect Heat
Turn on the outer burners (or two of three burners on a three-burner grill), leaving the center burner off. Place your food over the unlit burner. Close the lid. The active burners on either side create circulating hot air that cooks the food without burning it.
Setting Up a Charcoal Grill for Indirect Heat
There are two popular configurations:
The Two-Zone Bank — Push all your coals to one side of the grill. Place your food on the opposite side, away from the coals. This creates a hot side and a cool side, and you cook over the cool side with the lid closed.
The Horseshoe or Ring Method — Arrange coals in a ring around the perimeter of the grill, leaving the center empty. Food goes in the center. This works especially well for whole birds or large roasts because the heat comes from all directions.
The Two-Zone Setup: Why It Changes Everything
Here's the thing most grilling guides skip past: the two-zone setup is not just about indirect cooking. It's a management system.
When you divide your grill into a hot direct zone and a cooler indirect zone, you gain something that grilling on a flat, uniformly hot surface never gives you — control over pace. You can sear a steak on the hot side, then move it to the indirect side to finish cooking to temperature without burning. You can pull a chicken thigh off direct heat if a flare-up starts. You can park finished items in the indirect zone to stay warm while you finish the rest of the meal.
The two-zone setup is the professional kitchen principle of mise en place, applied to outdoor fire. Everything has a place. Everything moves with intention.
On a gas grill: Light one side, leave the other off. High heat on one side, ambient cooking on the other.
On a charcoal grill: Bank all coals to one side. No coals on the other side.
Once you cook this way once, you'll never go back to trying to manage a uniformly hot grill again.
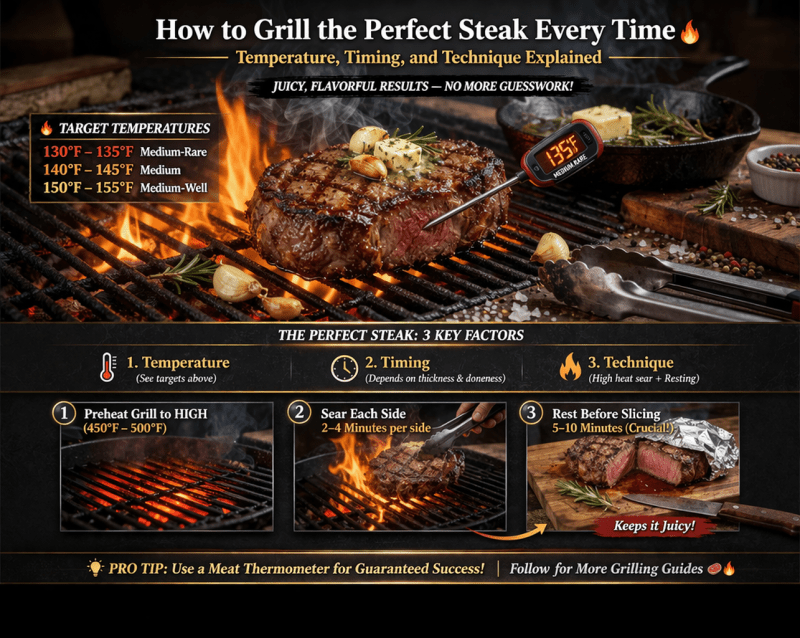
Temperature Ranges and What They Mean
Direct heat grilling typically happens between 450°F and 550°F (230°C–290°C) at the grate level. Some searing applications push even higher. At these temperatures, the Maillard reaction — the chemical process responsible for browned, caramelized, flavorful surfaces — happens fast.
Indirect heat cooking usually runs between 225°F and 375°F (107°C–190°C) depending on what you're cooking. Low-and-slow barbecue (ribs, pulled pork, brisket) lives at the lower end of that range. Roasting a whole chicken or a pork loin is comfortable at 325°F–375°F.
A grill thermometer is not optional. The built-in dome thermometers on most grills are notoriously inaccurate — often reading 50–75 degrees lower than the actual temperature at grate level. Invest in a quality instant-read or probe thermometer and verify what's actually happening inside your grill.
The Reverse Sear: Indirect First, Direct Second
The reverse sear has become one of the most praised techniques in modern grilling — and it's a perfect illustration of using both heat methods strategically within a single cook.
The traditional approach to a thick steak: sear first over high direct heat to build a crust, then move to indirect heat to bring the internal temperature up to target. The problem is that the searing creates a gradient — the outer inch or so of the steak is well-done or medium-well before the center reaches medium-rare.
The reverse sear flips this logic. You start the steak on indirect heat at a low temperature — around 225°F–250°F — and cook it slowly until it's about 10–15 degrees below your target internal temperature. Then you move it to screaming-hot direct heat for a 60–90 second sear on each side to build the crust.
The result is a steak that's edge-to-edge medium-rare (or whatever your target is) with a thin, deeply browned, crackling crust. The gradient problem disappears entirely. The internal temperature is uniform from edge to edge.
This is a technique that requires understanding both heat types and knowing how to transition between them. Once you've done a reverse sear, a traditionally-seared steak looks like a compromise.
Direct vs. Indirect: A Practical Guide by Food Type
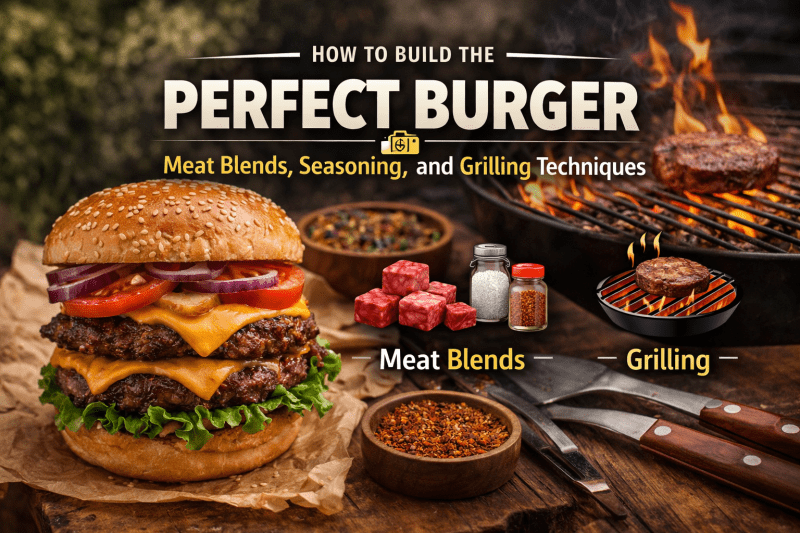
Burgers
Direct heat, medium-high. Burgers need the sear. 3–4 minutes per side for a half-inch patty. Thicker smash burgers or stuffed burgers may benefit from a brief indirect finish.
Steaks (under 1 inch)
Direct heat only. Move fast, use high heat, and don't overcrowd the grill. Rest for 5 minutes after.
Steaks (over 1.5 inches)
Reverse sear (indirect then direct) or direct sear then indirect finish. A proper thick ribeye needs the two-zone method to avoid a charred exterior over a raw center.
Chicken Breasts
Two-zone, starting direct. Sear for 2–3 minutes per side to get color, then move to indirect heat to finish safely to 165°F. Chicken breasts are notoriously unforgiving — they dry out on all-direct heat before the center is safe.
Chicken Thighs and Drumsticks
Indirect first, direct to finish. The fat content and bone make these forgiving and rewarding. Cook indirect until they're close to temp, then a short pass over direct heat crisps the skin beautifully.
Whole Chicken or Spatchcocked Chicken
Indirect heat only, 350°F–375°F. A whole bird needs even, patient cooking. Spatchcocking (removing the backbone and flattening the bird) makes indirect cooking faster and more even. Skin can be crisped with a brief blast of direct heat at the end.
Pork Chops
Direct heat, medium. Thin chops (under 3/4 inch) go fully direct. Thick pork chops benefit from the same reverse sear logic as thick steaks.
Ribs
Indirect heat, 225°F–250°F, low and slow. Ribs are a multi-hour project. They need time for the connective tissue to break down, and direct heat will turn them tough and black. Baby back ribs typically run 3–4 hours. Spare ribs go 5–6 hours. Wrapping in foil halfway through (the "Texas crutch") speeds the process.
Fish Fillets
Direct heat, medium, and quickly. Fish cooks fast. Delicate fillets need a clean, well-oiled grill and minimal fussing. Thick fish steaks (swordfish, tuna) can be treated like a steak.
Whole Fish
Indirect heat or two-zone. A whole fish needs interior cooking time that direct heat will ruin before it's done. Indirect at 350°F works beautifully.
Vegetables
Depends on size. Sliced zucchini, peppers, asparagus — direct heat, medium-high. Whole heads of cauliflower, stuffed tomatoes, corn still in the husk — indirect heat.
Common Mistakes and How to Fix Them
Mistake #1: Putting Cold Meat on the Grill
Cooking proteins straight from the refrigerator creates uneven cooking. The exterior faces extreme heat while the interior is 38°F. Let thicker cuts sit at room temperature for 20–30 minutes before grilling. This reduces the temperature gradient and makes consistent results dramatically easier.
Mistake #2: Lifting the Lid Constantly
Every time you lift the lid on an indirect-heat cook, you lose heat and add time. The lid is what turns your grill into an oven. Trust the process and check temperatures with a probe thermometer instead of visual checks.
Mistake #3: Pressing Down on Burgers or Steaks
This squeezes out the juices and drops them directly onto the flame, causing flare-ups. The juice doesn't come back. Press nothing.
Mistake #4: Grilling on Dirty Grates
Residue from previous cooks causes sticking, imparts off-flavors, and makes temperature management harder. Preheat your grill to burn off residue, then brush the grates clean before cooking.
Mistake #5: Using Only One Heat Zone
This is the big one. A grill set up with uniform heat all the way across is like a stovetop where every burner is always on full blast. You have no ability to manage pace, salvage a flare-up situation, or transition between cooking stages. Always set up at least two zones.
Mistake #6: Guessing Internal Temperature
Color, touch, and the "poke test" are unreliable. A $15 instant-read thermometer removes all guesswork. Use one every time.
Reading Your Fire: Signs the Heat Is Right
On a charcoal grill, the state of your coals tells the story:
- Gray-white ash, glowing orange underneath: Hot direct heat, ready for searing
- Fully ashed over, deep red glow: Lower direct heat, good for longer direct cooks
- Coals pushed to one side, other side clear: You're set for two-zone cooking
On a gas grill, the thermometer is your guide — but learn to listen to the sizzle. A proper sear sounds like a sustained, confident sizzle when the protein hits the grates. If it sounds weak or takes several seconds to start sizzling, your grill is too cool. If it immediately smokes aggressively and spatters, you're too hot or there's residual grease.
The grill will tell you what it needs. Pay attention to what it's saying.
Fuel Type and Its Effect on Heat Character
Charcoal (briquettes): Burns long and consistently. Good for extended indirect cooks. Less responsive to temperature adjustment but reliable once established.
Charcoal (lump hardwood): Burns hotter and faster than briquettes, with more variation. Responds better to airflow adjustments via vents. Preferred by many competition cooks for its cleaner flavor.
Gas (propane or natural gas): Precise and instantly adjustable. The most convenient option for two-zone setups because you simply turn burners on or off. Lacks the smoke character of charcoal but wins on control.
Wood chunks or chips: Used as a supplement on charcoal or gas to add smoke flavor. On a gas grill, soak chips and place in a smoker box or foil pouch over a burner. On charcoal, throw wood chunks directly onto the coals during indirect cooking. Different woods (oak, hickory, cherry, apple) add different flavor profiles.
Building a Consistent Grilling Practice
Mastery doesn't come from doing something once correctly. It comes from doing something the same way enough times that you can identify and correct the variables.
Keep a simple grilling log — even just notes on your phone. Write down the cut, the weight, the grill temperature, the cooking method, and the internal temperature at pull. After ten or fifteen cooks, you'll have a personal reference that's more useful than any chart in any cookbook, because it's based on your grill, your fuel, your environment.
Grills behave differently. A 500°F reading on a gas grill in July in Texas is not the same as a 500°F reading on a kettle charcoal grill in November in Ohio. Wind, ambient temperature, grill age, and charcoal quality all affect actual cooking behavior.
The best grillers aren't the ones with the most expensive equipment. They're the ones who know their equipment.
The Final Word on Heat Mastery
Direct heat and indirect heat aren't competing philosophies. They're complementary tools, and knowing when to use each one — and when to combine them — is the actual skill at the center of consistent, high-quality grilling.
Direct heat gives you speed, surface texture, and the caramelized flavors that define grilled food. Indirect heat gives you even cooking, patient rendering of fat and collagen, and the ability to cook large cuts without burning them to a shell.
Use them together and you get both: the sear and the tenderness, the crust and the juicy interior, the char and the fully-cooked center.
That's not luck. That's technique. And technique, unlike talent, is entirely learnable.
Set up your two zones. Trust your thermometer. Pay attention to the fire. The rest takes care of itself.