There are few things in the culinary world that carry as much primal satisfaction as a perfectly grilled steak. The char on the crust. The blush of pink running through the center. The way the fat has rendered just enough to pool beneath the crust without disappearing entirely. It is a thing of beauty — but it is also a thing of science, practice, and a handful of decisions made well before the grill ever gets hot.
Most people overcomplicate steak or, worse, underthink it. They either obsess over every micro-variable until cooking becomes anxiety-inducing, or they throw a cold, wet piece of meat onto a lukewarm grill and wonder why it tastes like the inside of a gymnasium. Neither approach serves the steak.
This guide cuts through both extremes. It covers what actually matters — the cuts, the prep, the fire, the temperatures, the timing, the resting — and explains the why behind each step so that once you understand the logic, you never need to consult a recipe again. You'll grill by feel, by instinct, and by knowledge. And you'll get it right every single time.
Start With the Right Cut — Because Technique Can Only Do So Much
A grill is a powerful tool, but it is not a miracle worker. The cut of beef you choose sets a ceiling on what's possible. Choose well, and technique elevates the steak. Choose poorly, and no amount of skill fully compensates.
The Heavy Hitters for High-Heat Grilling
Ribeye is arguably the king of the grill. The heavy marbling — those white threads of intramuscular fat — melts during cooking, basting the meat from the inside. The result is a rich, almost buttery steak with a depth of flavor that cheaper cuts simply cannot match. Look for bone-in ribeyes (often labeled "cowboy cut" or "tomahawk") when you want drama and extra flavor from the bone.
Strip steak (New York strip, Kansas City strip) offers a firmer texture with a slightly leaner profile than ribeye, but it compensates with a bold, beefy flavor and a satisfying chew. The fat cap along the edge should be left on during grilling — it renders beautifully and bastes the meat as it cooks.
T-bone and Porterhouse are two steaks in one: a strip on one side of the bone, a tenderloin on the other. The challenge here is that both sides cook at different rates. The tenderloin, being leaner and more delicate, finishes faster. Managing that difference is part of the craft.
Tenderloin (Filet Mignon) is the most tender cut on the animal. It has very little fat, which means it's forgiving on texture but unforgiving on overcooking — dry it out and you've wasted money. It benefits from a high-heat sear and careful attention to doneness.
Flank and skirt steaks are thinner, looser-grained cuts that reward high heat and quick cooking. They need to be sliced against the grain after resting, or the texture suffers. Marinating them beforehand adds flavor and helps tenderize the muscle fibers.
Thickness Is Not a Preference — It's a Variable
Whatever cut you choose, thickness matters enormously. Steaks cut thinner than one inch are difficult to cook to a precise internal temperature without overcooking the exterior. At that thickness, the window between perfectly cooked and overdone is measured in seconds, not minutes.
For the best results, aim for steaks between 1.25 and 2 inches thick. This gives you enough depth to develop a proper crust on the outside while still hitting your target temperature in the center. A 1.5-inch ribeye, for instance, has a clear, manageable gap between when the exterior chars and when the interior reaches temperature.
The Prep Work That Most People Skip
Great grilling starts hours before you light the grill. The prep phase is where you set up success — and skipping any part of it means compensating at the grill, which is never ideal.
Dry-Brining: The Single Biggest Upgrade You Can Make
Dry-brining is the practice of salting your steak well in advance of cooking — ideally 24 to 48 hours ahead, though even 45 minutes makes a meaningful difference. The salt draws moisture to the surface of the meat, where it dissolves and forms a concentrated brine. That brine is then reabsorbed into the meat, seasoning it deep in the muscle rather than just on the surface.
The secondary benefit is texture. As the brine is reabsorbed and the surface of the steak dries out in the fridge, uncovered on a rack, you get a drier exterior. Dry surface = better Maillard reaction = better crust. This is not a trivial difference. It is one of the most impactful steps in steak cookery, and it costs nothing except forethought.
Use kosher salt, applied generously. Both sides, the edges too. Set the steak on a wire rack over a sheet pan and leave it uncovered in the refrigerator. The rack allows air to circulate beneath the meat, drying the surface from both sides.
Room Temperature — Partially True, Often Misunderstood
There is a persistent belief that steaks must come fully to room temperature before grilling. The underlying logic is sound — cold centers take longer to cook, widening the band of overcooked exterior — but the practical reality is that a thick steak at room temperature for 30 minutes is still very cold in the center.
What actually matters is that the steak isn't ice-cold from the fridge right before it hits the grill. Let it sit out for 30 to 45 minutes before cooking. This takes the extreme chill off the center without turning it into a food safety concern. If you're reverse-searing (more on that later), this step becomes less critical anyway.
Pat It Dry, Always
Even if you haven't dry-brined, always pat the surface of the steak thoroughly dry with paper towels before it goes on the grill. Surface moisture is the enemy of crust formation. When wet meat hits a hot grate, the moisture steams off before the Maillard reaction can begin, and you lose precious crust-building time. A dry surface is a crust-ready surface.
Building the Right Fire — Two-Zone Heat Is the Framework
Understanding fire management is what separates confident grillers from those who hover anxiously over the grate. The most important concept is two-zone cooking: a hot side and a cool side.
How to Set Up Two-Zone Heat
On a charcoal grill, pile your lit coals on one side of the grill. The area directly over the coals is your high-heat zone. The area on the opposite side, with no coals beneath, is your indirect zone.
On a gas grill, turn the burners on one side to high and leave the burners on the other side off (or on very low). Same concept, different fuel.
This setup lets you sear over direct, screaming-hot heat to develop crust, and then move the steak to the indirect zone to bring the interior up to temperature without burning the exterior. For thick steaks, this two-step approach produces far more consistent results than cooking over direct heat alone.
How Hot Is Hot Enough?
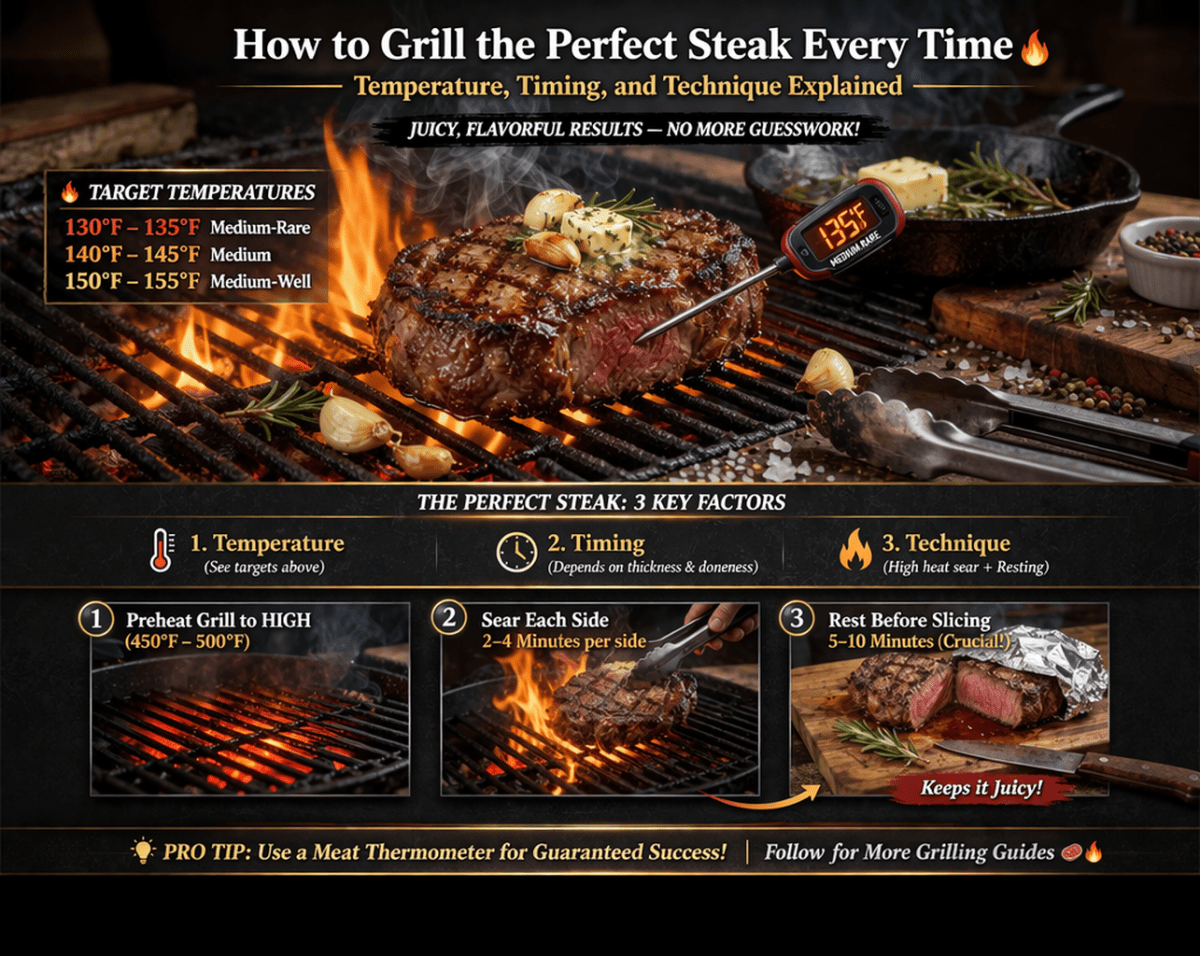
For searing, you want high heat — surface temperatures in the range of 450°F to 550°F (230°C to 290°C). At this temperature, the Maillard reaction (the chemical process responsible for that brown, flavorful crust) happens quickly and aggressively.
A practical test for charcoal: hold your hand 5 inches above the grate. If you can only hold it there for 2 to 3 seconds before it becomes unbearable, you're in high-heat territory. That's where you want to be for searing.
The grill grates should be clean and oiled before cooking. Dirty grates cause sticking; clean, oiled grates allow the steak to release cleanly when the crust has properly formed.
The Temperature Guide — What "Doneness" Actually Means
Doneness is a function of internal temperature, not time alone. Time gives you an estimate; temperature gives you certainty. If you grill steaks without a reliable instant-read thermometer, you're guessing. And guessing is expensive when you're dealing with quality beef.
The Internal Temperature Chart
| Doneness | Internal Temp (°F) | Internal Temp (°C) | Description |
|---|---|---|---|
| Rare | 120–125°F | 49–52°C | Cool, deep red center |
| Medium-Rare | 130–135°F | 54–57°C | Warm, red-to-pink center |
| Medium | 140–145°F | 60–63°C | Pink, firmer throughout |
| Medium-Well | 150–155°F | 65–68°C | Slightly pink, mostly firm |
| Well Done | 160°F+ | 71°C+ | No pink, fully firm |
The most important thing to understand: remove the steak from the grill 5°F before your target. Carryover cooking — the continued rise in internal temperature after the meat leaves the heat — will bring it up those final degrees during resting. A steak pulled at 130°F will rest to about 135°F, landing squarely in medium-rare territory.
Why Medium-Rare Is the Standard
Medium-rare is the near-universal recommendation for steaks like ribeye, strip, and T-bone for two reasons. First, it preserves the moisture inside the muscle fibers. Above 140°F, muscle fibers contract significantly and expel moisture, leading to drier, tougher meat. Second, the intramuscular fat has had enough heat to begin rendering and lubricating the meat, but not so much that it has cooked out entirely.
For tenderloin, some chefs prefer the lower end of medium-rare or even rare, because the lack of fat means it dries out faster as temperature rises.
Timing and Technique — The Two Methods That Work Best
There are two dominant approaches to grilling a thick steak: the traditional sear-first method and the reverse sear. Both work. Both produce excellent results. They suit different situations and preferences.
The Traditional Sear-First Method
This is the classic approach: start the steak over high direct heat to build the crust, then move it to indirect heat to finish cooking through.
The process:
- Preheat your grill to high heat. Clean and oil the grates.
- Place the steak over direct high heat. Do not move it for 2 to 3 minutes.
- Flip once. Sear the other side for another 2 to 3 minutes.
- Check internal temperature. If not at target, move to indirect zone with the lid closed to finish.
- Check temperature every 2 to 3 minutes until 5°F below target. Remove and rest.
The key is to not move the steak constantly. Leaving it in place allows the Maillard reaction to build a crust. Flipping repeatedly interrupts this process. One flip, or at most two, is ideal for a standard sear.
For thick steaks (1.5 inches or more), expect to finish in the indirect zone. Thinner steaks (1 inch or less) may reach temperature during the sear phase alone.
The Reverse Sear — Superior Results for Thick Cuts
The reverse sear flips the sequence: cook the steak at low, indirect heat first, then finish with a high-heat sear at the end. The advantages are significant.
Cooking low and slow first brings the steak to within 10 to 15 degrees of the target temperature very gradually, producing an extraordinarily even internal color — edge to edge, wall to wall, the meat is the same temperature and doneness throughout. The sear at the end is purely for crust, not for cooking the center.
The process:
- Season the steak with dry brine 24 hours ahead.
- On the grill (or in a 250°F oven), cook the steak indirect until the internal temperature reaches 120°F for medium-rare (about 45 to 60 minutes for a thick steak).
- Remove the steak and let it rest for 10 minutes. Meanwhile, get your grill screaming hot.
- Sear the steak over direct high heat for 60 to 90 seconds per side. Watch it — the crust forms fast.
- Remove and rest briefly (just 5 minutes, since it was already brought up slowly).
The reverse sear also produces a drier surface before the final sear, which means an even better crust. It is the method of choice for tomahawks, thick porterhouses, or any steak over 2 inches.
The Resting Period — Non-Negotiable
You've heard it before: let the steak rest before cutting. This is not optional, and it is not just habit. There is a real physiological reason.
When a steak is on the grill, the muscle fibers contract from the heat and squeeze their moisture toward the center of the cut. The center of the steak becomes temporarily oversaturated with juice. If you cut the steak immediately, all that accumulated moisture rushes out onto the cutting board — leaving you with a drier steak and a wet board.
During resting, the muscle fibers relax and reabsorb that moisture. The juices redistribute evenly throughout the steak. Cut it now, and the moisture stays in the meat.
How long to rest? For steaks under 1.5 inches: 5 minutes minimum. For thick steaks and large cuts: 8 to 10 minutes. Tent loosely with foil to retain warmth, but don't seal it — you'll steam and soften the crust you worked to build.
Finishing Moves That Elevate a Good Steak to a Great One
The steak is off the grill and rested. Here's where the final few decisions matter.
Compound Butter
Compound butter — butter blended with herbs, garlic, shallots, or other aromatics — melted over a resting steak is one of the oldest and most reliable finishing techniques. The fat carries flavor compounds directly onto the crust and into the first few millimeters of meat. Classic combinations: roasted garlic and thyme, blue cheese and chive, anchovy and parsley, smoked paprika and lemon zest.
Make it ahead. Keep a log in the freezer. Slice off a round for each steak as it rests.
Finishing Salt
Flaky sea salt — Maldon, fleur de sel, or similar — added immediately before serving provides textural contrast and bursts of salinity that fine salt cannot replicate. It is a small addition with a noticeable payoff. The crystals crunch slightly against the crust and dissolve on the tongue in a way that's distinctly different from salt cooked into the meat.
Slicing Against the Grain
For any cut with a pronounced grain — flank steak, skirt steak, hanger steak, flat iron — slicing against the grain is not optional. The grain refers to the direction of the muscle fibers. Cut with the grain and you're cutting long fibers that become chewy and tough. Cut against the grain and you're cutting those fibers short, dramatically improving tenderness. Look at the surface of the steak, identify which direction the lines run, and cut perpendicular to them.
Common Mistakes and How to Correct Them
Mistake: Pressing the Steak Down on the Grill
Some grillers press the steak down with a spatula, believing it speeds cooking or improves crust contact. It does neither — it squeezes out moisture and deflates the steak. Leave it alone.
Mistake: Grilling a Wet Steak
Surface moisture is crust's enemy. Whether from thawing liquid, marinade, or condensation, wet meat does not sear — it steams. Always pat dry before grilling. If using a marinade, remove as much of it as possible from the surface before the steak hits the grates.
Mistake: Cooking Over Inconsistent Heat
Uneven heat produces uneven results — some areas overcooked, others underdone. Know your grill's hot spots. Most gas grills have one, usually near the back or the left burner. Rotate your steak during cooking to account for these variations, or identify and avoid them deliberately.
Mistake: Cutting Too Early
This is the most common and most damaging mistake. A steak cut immediately off the grill will bleed out onto the board. Five minutes is the minimum rest time for most steaks; ten is better for anything over 1.5 inches. Set a timer and walk away.
Mistake: Trusting Color Over Temperature
The exterior color of a steak tells you almost nothing about the interior. Dark charring outside does not mean well-done inside. A pale, underdeveloped crust does not mean rare. Color is a crust indicator. Internal temperature is a doneness indicator. Use a thermometer. Every time.
A Word on Equipment Worth Having
You don't need an arsenal of gear to grill a great steak. But a few tools pay dividends.
An instant-read thermometer is the single most important piece of equipment besides the grill itself. A Thermapen or any quality instant-read thermometer removes all guesswork. Buy one once; use it for years.
Long-handled tongs give you control and distance from the heat. Avoid forks — piercing the steak allows juices to escape.
A cast-iron grate insert (if your grill accepts one) retains heat more effectively than thin stainless or porcelain grates, producing more aggressive sear marks and better overall crust development.
A wire rack over a sheet pan is essential for dry-brining and reverse-searing. Allows air circulation on all sides of the steak.
Bringing It All Together
Grilling a perfect steak every time is not about rigid adherence to a single method. It's about understanding the variables — the cut, the thickness, the fire, the temperature, the timing — well enough to adapt intelligently when something changes. A thicker steak, a windier day, a different grill, a cut you haven't worked with before: none of these are problems if you understand the underlying principles.
Salt early. Dry the surface. Build a proper fire with a hot zone and a cool zone. Sear aggressively. Track temperature, not time. Rest the steak completely before cutting. Finish with flaky salt and a pat of compound butter if you want to take it one step further.
That's the whole framework. Everything else is personal preference and refinement over time.
The best steak you've ever made is probably still ahead of you — and now you have every tool you need to cook it.
Whether you're grilling for yourself on a Tuesday or hosting the neighborhood on a Saturday, these fundamentals hold. Master them, and the grill becomes one of the most reliable and rewarding cooking tools you own.